I love a good piano patch. I’ve spent a ton of time thinking about what makes a piano sound interesting and I think it really comes down to three things.
- Color
- Presence
- Texture
There was a time that I really hated using
Color
When I talk about “color”, I am specifically referring to saturation that has been added to the low-mids. It doesn’t have to be a ton, and sometimes, it’s not needed at all. But time and time again I find myself adding a little but of saturation or distortion there to help give my piano sounds a little more body.
Presense
When I talk about “presence” I am specifically thinking about
Texture
When I talk about “texture” I am specifically referring to making sure the high end of your sound, between 50k and
Pro Pianos

If you are looking for some lively piano sounds, make sure you check out the Pro Pianos Page. I created 6 patches inspired by famous songs that will work well in any live situation. They are fully racked with helpful audio effects for piano, and I know you will love them.
Three Audio Effects
There are many ways to accomplish a great piano sound. Today we are exploring 1 way. I encourage you to start here, and then begin to play around with what else you might be able to use, how else you can add a little character to your piano sounds.
The three effects we are going to use on today’s piano patch are:
- Dynamic Tube Preset- Hot Tape
- Compressor
- Reverb
Simple choices, but lets watch them transform your sound.
Dynamic Tube Settings

Add the preset “Hot Tape” immediately after your piano patch.
Since we don’t want any delay in when the saturation starts, turn the envelope to o%
Adjust the Bias to 37%
Add the drive to about 7dB
Adjust the output to about 2 dB
Compression Settings
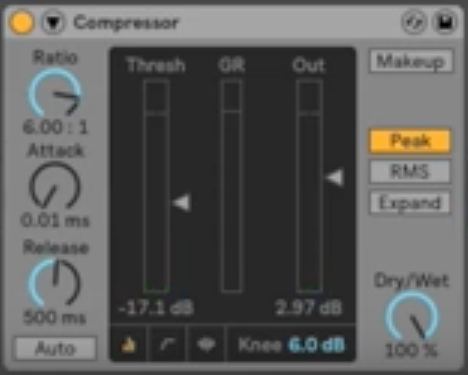
Remember the purpose of the compressor within this context: Decrease initial attack, increase overall sustain. Bearing all that in mind, lets proceed.
Set the ratio to 6:1
Attack to 0. Because we want the compressor to start compressing immediately. (This is more generally the case when playing with a band. When playing solo, its best to leave the attack higher)
Release to 500ms. This gives our piano sound the sustain we are looking for.
Adjust the
Getting the threshold just right may take a little bit of experimenting. The actual value of the threshold is going to vary from person to person, and from piano patch to piano patch. So don’t get discouraged, and use your ears.
Turn the compressor off, and check the loudness of the piano patch.
Turn the compressor back on, and add make up gain until the level is roughly the same.
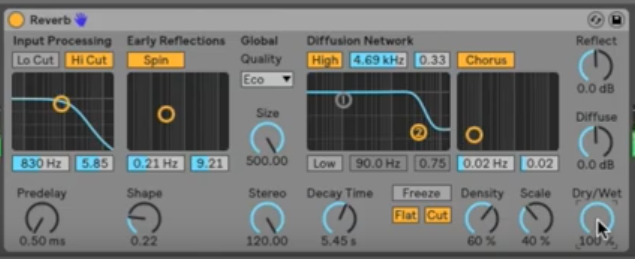
Reverb Setting
An
With our reverb, we want to add sustain, additional harmonic information, and some stereo information. Bearing that in mind, here are the settings I used for this video.
What To Do Now?
I encourage you to keep playing with your patches until you find something that gets you excited about making music and sound.
You can try adding a touch of glue compression after the reverb which will produce a very interesting dynamic effect.
Make sure you join the facebook
If you found this post helpful, share it with your friends!
As always, feel free to reach out to me via my contact page, or through facebook.
Happy creating!
-Brett